Sound Reduction System Review – How it works and would I recommend it
You’ve reached our Sound Reduction System Review. Below we’ll be reviewing the Wispa Sound Reduction System and finding out if it delivers on its promises of a quieter darts setup at home.
We’ll also included some easy to follow instructions of how to setup up if you decide to invest in this bit of kit.
Normally when your darts hit the board they make a loud thud but the Wispa Sound Reduction System eliminates the kinetic sound transfer when the darts enter the board. All it takes is for you to look at the reviews or the videos out there, having the Sound Reduction System behind the Dartboard makes a massive difference if you’re in another room.
We’ve tested this Sound Reduction System and although it doesn’t make playing darts completely silent, it does make it very, very quiet. It won’t wake anyone up at night time or annoy your neighbours.
I would highly recommend this product as it does what it says and you won’t find another product in the world that can make your darts hitting the board sound so quiet in another room.
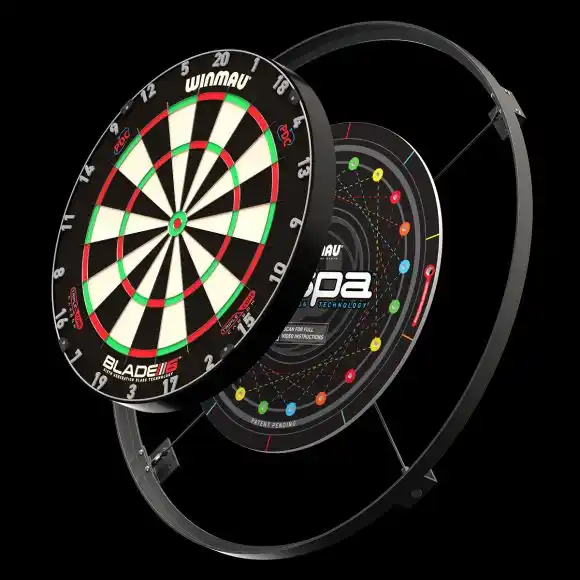
The Winmau Wispa Sound Reduction System consists of two main parts, namely a round disc to which your dartboard is attached and a large ring that you attach to the wall. The board your dartboard is attached to is stretched within this ring. Thus, your dartboard has no direct contact with the wall.
Click here to find out more about the Wispa Sound Reduction System
How to set it up
Step 1 – Remove your current Dartboard from your wall
Step 2 – Position the Wispa ring so that the cables are at a 45 degree angle and the tensioners are at the bottom
Step 3 – If you are fitting this where a dartboard has previously been, line up the cross in the cables with the centre of the U bracket
Step 4 – If you’re fitting your Dartboard at a new location,mark 1.73 m from the floor on your wall. Line up the cross in the cables with the mark
Step 5 – Using a pencil, mark the eight hole centres for the bracket feet
Step 6 – Drill holes in the eight holes you just marked
Step 7 – Fill the holes in with a fixing suitable for the wall
Step 8 – Screw the ring to the wall ensuring that the cables are still at a 45 degree angle
Step 9 – Using the spanner and allen key as provided, tension the cables
Step 10 – Locate two registration holes on the back of the Dartboard
Step 11 – Place the disc on the back of the Dartboard with the printed side facing upwards
Step 12 – Line the disc up with the two registration holes
Step 13 – Use the two pins that you are give and place them in the registration holes
Step 14 – Make sure the red line at the top of the disk is behind the treble 20 segment
Step 15 – Follow the dotted line and colour coded circles to secure the hanging wheels in the corresponding holes
Step 16 – Put the dartboard up to the cables slightly above centre
Step 17 – Lower the Dartboard onto the cables
Step 18 – If you have one put the Dartboard surround on
View more information on the Wispa Sound Reduction System on the product page in our shop.
You can also visit the Winmau website for more information and images.
